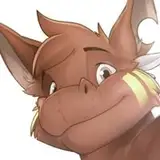
The most obvious and simplest way to pick a color to shade with is to eyedrop the color from the fill layer-in this case her face, which is light greyed yellow.

I open the color picker with the eyedropped face color.

Then I click lower in the picker to a darker shade of the same color.

I airbrush this color along the edge of her face and get this effect.

It's ok but using the same exact hue in just a darker shade makes the face look monochromatic which is not what I'm after. I'll try another layer below the dark airbrushed layer and pick a more saturated and lighter shade of the yellowish grey. (By moving the cursor in the color picker slightly to the right I get a slightly more saturated color).

I'll use this color on a layer below the dark airbrush layer to airbrush a wider area of the new color.

I'm still not crazy with the result but I'll leave it for now and come back to it after I have rendered some other ares.

I'll tell what I'm trying for. I want the image to look like those 30s and 40s airbrushed cartoon characters they used in the title cards.

On to the nose. I open the fill layer of the nose and select it so I can paint over it on layers above it.

I want the nose to look extra shiny as if lit from within.
I eyedrop the nose color and then very slightly move the slider up towards the violet hue. I also make the color a little lighter than the fill color and airbrush an underlight to the left of the nose.

Next I move the slider down towards a mid blue hue and and make it a bit darker. Then use a wide airbrush to paint the top right area.

I want the nose to stand out more so I'm going to paint a thinner darker rim to the right of the nose for more contrast. I use a brush that's sort of like an airbrush but has some spatter in it. I think you can find the brush in one of Kyle's brush sets that you can download from the Photoshop page. (It won't be called 'Freal Logo Brush'. I forget what it was originally called but just look for a brush that looks like the one selected.)

I'm looking at it and think that the edge is too crisp and doesn't quite blend in with the rest of the nose so I'm going to soften it a bit. I go to the filter menu at the top of the Photoshop window.
Filter/blur/Gaussian Blur

The middle of the nose looks too flat now so I go to the layer with the wide airbrush at the upper left of the nose and darken it by clicking 'command U' and sliding the 'Lightness' bar to the left slightly.


Now for a highlight for the nose like all decent cartoon characters with bulb noses have. I draw a shape for the highlight and fill it with the same color as the line.

I will use this as a mask to paint the highlight with. First I select the shape and turn off the layer.


I don't want the highlight to have a sharp edge so I'll feather it.
First I go up to the select menu, drag down to 'modify' and right to 'contract'. I don't remember how many pixels I contracted it, but I think around 12.

Then to create a fade I go up to the select menu again, drag down to modify and drag right to 'feather'. I choose the same amount of pixels to feather as I contracted - 12. This means when I paint over the selection there will be a 12 pixel fade out.

Now that the selection has a fade out I apply a gradient to a layer above the fill layer and pick two light colors, one a bit lighter than the other. I click the gradient tool and choose a radial gradient and drag the brush from the center to the outer edge. The lighter color is at the center.)

I turn off the selection and zoom out to see the whole nose.

It could use a little more work but I don't want to overdo anything at this stage. I still have more to paint and I'll continue in another post.